Now, I wanted to install OpenCV on Ubuntu also. Since OpenCV does not have a pre-built package for Linux, it meant I had to compile OpenCV from source.
 |
| OpenCV 3.1 running on Lubuntu 16.10 |
Adrian of PyImageSearch has recently done a post about how to compile OpenCV on Ubuntu 16.04 using virtualenv. I followed his steps as a base, but had to make numerous adjustments to some of the packages which gets installed (e.g. libpng-dev, libhdf5-serial-dev) and the build commands due to the changes from Ubuntu 16.04 to 16.10, and because I'm using Anaconda environments rather than virtualenv.
I'll be installing OpenCV 3.1, and will be using the Lubuntu 16.10 virtual machine which I used in my earlier post. But the steps and commands will be exactly the same for any flavor of Ubuntu 16.10.
First, as a habit, get and install the latest updates for Ubuntu,
 sudo apt-get update
 sudo apt-get upgrade
Then (if you have not done already) install the necessary build tools,
sudo apt-get install build-essential cmake git unzip pkg-config
Then, we install the following packages which allows OpenCV to interact with various image and video formats,
 sudo apt-get install libjpeg8-dev libtiff5-dev libjasper-dev libpng-dev
 sudo apt-get install libavcodec-dev libavformat-dev libswscale-dev libv4l-dev
 sudo apt-get install libxvidcore-dev libx264-dev
Note: on Ubuntu 16.04, the package name for libpng was libpng12-dev. But on 16.10, it should be libpng-dev.
Install the GTK dev libraries to support GUI functions of OpenCV,
sudo apt-get install libgtk-3-dev
The following libraries optimize several functions of OpenCV (source: PyImageSearch)
sudo apt-get install libatlas-base-dev gfortran
The Python binaries installed with the Anaconda installation contains the development headers. However, I got few errors while compiling without installing the following packages,
sudo apt-get install python2.7-dev python3.5-dev
If you haven't installed Anaconda Python yet you can follow my earlier post to get it installed.
Follow it to install Anaconda and then create a Python 3.5 environment. I'll be using the same 'keras-test' environment I created in my earlier post.
We won’t necessarily need to have Keras or Theano installed, but we do need numpy. So, make sure you install the following conda packages at a minimum when creating the environment.
conda create --name keras-test numpy scipy pillow h5py
Now that our environment is ready, we can download the OpenCV sources,
 cd ~
 wget -O opencv.zip https://github.com/Itseez/opencv/archive/3.1.0.zip
 wget -O opencv_contrib.zip https://github.com/Itseez/opencv_contrib/archive/3.1.0.zip
 unzip opencv.zip
 unzip opencv_contrib.zip
Make sure you have activated the Anaconda environment you created,
source activate keras-test
Now, we are ready to compile OpenCV.
We first configure the build using CMake. But first we must figure out some library paths. Since the Anaconda installation is independent from the system installed Python, and CMake defaults to system paths, we need to tell CMake to where to find the correct library path and include path for headers.
The Python executable in Anaconda will be at ~/anaconda3/envs/<environment name>/bin/python e.g. ~/anaconda3/envs/keras-test/bin/python for my keras-test environment
The library path would be ~/anaconda3/envs/<environment name>/lib/python3.5 e.g. ~/anaconda3/envs/keras-test/lib/python3.5
And the include directory would be at ~/anaconda3/envs/<environment name>/include/python3.5m e.g. ~/anaconda3/envs/keras-test/include/python3.5m
Note: these paths are when you're using Python 3.5. If using Python 2, look for the appropriate directories in your Anaconda environment.
With the paths resolved, we start configuring the build,
 cd ~/opencv-3.1.0/
 mkdir build
 cd build
 cmake -D CMAKE_BUILD_TYPE=RELEASE \
   -D CMAKE_INSTALL_PREFIX=/usr/local \
   -D INSTALL_PYTHON_EXAMPLES=ON \
   -D INSTALL_C_EXAMPLES=OFF \
   -D OPENCV_EXTRA_MODULES_PATH=~/opencv_contrib-3.1.0/modules \
   -D PYTHON_EXECUTABLE=~/anaconda3/envs/keras-test/bin/python \
   -D PYTHON_LIBRARY=~/anaconda3/envs/keras-test/lib/python3.5 \
   -D PYTHON_INCLUDE_DIR=~/anaconda3/envs/keras-test/include/python3.5m \
   -D BUILD_EXAMPLES=ON ..
Make note of the PYTHON_EXECUTABLE, PYTHON_LIBRARY, and PYTHON_INCLUDE_DIR parameters and update them with the paths for your installation, which we found earlier.
You may also need to add the ENABLE_PRECOMPILED_HEADERS=OFF parameter, if you encounter an error like stdlib.h: No such file or directory while running make command. Will get to that in a bit.
Once CMake finishes, examine the output of the console. See below image.
 |
| CMake finished configuring the build |
Pay close attention to the Python 2 and Python 3 blocks. Under them, the Interpreter, Libraries, numpy, and packages path should all be populated properly.
If any of them are missing, double check the paths in the CMake command, and re-run.
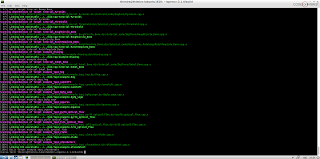
Once CMake completes successfully, run the make command to start compiling OpenCV,
make
 |
| make is compiling OpenCV |
If you run into an error (around the 9% mark of the compile) saying stdlib.h: No such file or directory, then you need to add the ENABLE_PRECOMPILED_HEADERS=OFF parameter to CMake.
 |
| stdlib.h error while running make |
To do that, first delete the build directory you created in the OpenCV directory, create a new build directory, and run CMake again with the new parameter,
 cd ../
 rf -rf build
 mkdir build
 cd build
 cmake -D CMAKE_BUILD_TYPE=RELEASE \
   -D CMAKE_INSTALL_PREFIX=/usr/local \
   -D INSTALL_PYTHON_EXAMPLES=ON \
   -D INSTALL_C_EXAMPLES=OFF \
   -D OPENCV_EXTRA_MODULES_PATH=~/opencv_contrib-3.1.0/modules \
   -D PYTHON_EXECUTABLE=~/anaconda3/envs/keras-test/bin/python \
   -D PYTHON_LIBRARY=~/anaconda3/envs/keras-test/lib/python3.5 \
   -D PYTHON_INCLUDE_DIR=~/anaconda3/envs/keras-test/include/python3.5m \
   -D ENABLE_PRECOMPILED_HEADERS=OFF \
   -D BUILD_EXAMPLES=ON ..
Go through the same checks we did earlier when running CMake, and then run make again.
Adding the ENABLE_PRECOMPILED_HEADERS=OFF parameter would make the compile extremely slow.
You may also run into an error (around the 82% mark of the compile for me) saying fatal error: hdf5.h: No such file or directory.
 |
| hdf5.h error while running make |
If you get this error, you will need to do some fiddling in the source code to get it to compile.
First, make sure you have the hdf5 library installed by running,
sudo apt-get install libhdf5-serial-dev
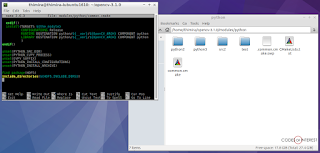
Then you need to edit the file common.cmake in the ~/opencv-3.1.0/modules/python/ directory.
 |
| locating the common.cmake file |
Edit that file, and add the following 2 lines at the very end of that file,
 find_package(HDF5)
 include_directories(${HDF5_INCLUDE_DIRS})
 |
| editing the common.cmake file to add the path of hdf5 to the build path |
After editing that file, do a make clean and run make again.
> make clean
 make
(If you get an error again, delete the build directory, re-create it, and run the commands again starting with CMake)
If all goes well, make will finish successfully.
 |
| make finished successfully |
Now, you can install OpenCV from the compiled source,
 sudo make install
 sudo ldconfig
The final step would be to symlink the compiled OpenCV python library from the installation in to your Anaconda installations library directory.
For Python 3.5, the compiled file will be located at /usr/local/lib/python3.5/site-packages/ and will be named cv2.cpython-35m-x86_64-linux-gnu.so
We'll copy the file in place to rename it to cv2.so and symlink it to our Anaconda environment,
 cd /usr/local/lib/python3.5/site-packages/
 sudo cp cv2.cpython-35m-x86_64-linux-gnu.so cv2.so
 cd ~/anaconda3/envs/keras-test/lib/python3.5/site-packages
 ln -s /usr/local/lib/python3.5/site-packages/cv2.so cv2.so
Note: make sure to update the command to match your Anaconda environment name.
For Python 2, the file will be at /usr/local/lib/python2.7/site-packages/ and will be named cv2.so (so there's no need to copy it in place to get the name right).
Now, deactivate and activate the Anaconda environment again.
 source deactivate
 source activate keras-test
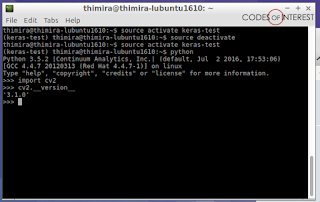
Open the Python interpreter and load the cv2 module to verify the OpenCV installation,
 (keras-test) thimira@thimira-lubuntu1610:~$ python
 Python 3.5.2 |Continuum Analytics, Inc.| (default, Jul 2 2016, 17:53:06)
 [GCC 4.4.7 20120313 (Red Hat 4.4.7-1)] on linux
 Type "help", "copyright", "credits" or "license" for more information.
 >>> import cv2
 >>> cv2.__version__
 '3.1.0'
 >>>
 |
| cv2 module loaded in Python successfully |
If no errors comes, you are good to go.
 |
| a LeNet exanple running with OpenCV and Keras |
Happy OpenCV programming :)
Related links:
http://www.pyimagesearch.com/2016/10/24/ubuntu-16-04-how-to-install-opencv/
https://github.com/opencv/opencv/issues/6016
Build Deeper: Deep Learning Beginners' Guide is the ultimate guide for anyone taking their first step into Deep Learning.
Get your copy now!


Thank you for the tutorial. I just want to add a side note that it takes hours to run the "make" command. I MEAN HOURS, on a fast modern CPU. So if you know your specific CUDA card version, add -DCUDA_ARCH_BIN='6.1' (for GTX 1050-1080 card) and -DCUDA_ARCH_PTX="" flag to cmake. This helps speed up the compilation time to a fraction of normal build time.
ReplyDeleteAgain, thank you.
First of all thanks for awesome Tutorial
ReplyDeleteplease help me..
after giving..
udo apt-get install build-essential cmake git unzip pkg-config
I found that cmake package is not available.
the what can I do?
/miniconda3/envs/ke-te/bin/../lib/libfontconfig.so.1: undefined symbol: FT_Done_MM_Var
ReplyDeleteI am getting this error when i am running it in jupyter notebook. Can you please let me know how to resolve it thanks a ton for your tutorial